
GEC Tidioute Beaver Tail Trapper, hard opening pull fix
Jul 14, 2013 0:18:38 GMT -8
CoRnhOlio, Tiller., and 6 more like this
Post by Cold Safari on Jul 14, 2013 0:18:38 GMT -8
G'day All!
I’ve had this knife for about 6 years, and have only ever carried it maybe 10 times total. Its just so hard to open it with GECs signature bear trap springs, and the half stops.
SO, I got fed up and took it apart and rounded one tang corner off, so its a nice easy pull to the half stop, where I can the pinch the blade good and tight and pull to full open.
I’ll be honest, i took a little too much off, and there is almost no spring pressure closure… It has just a touch to help hold it shut, but no spring/snap closing. I over peened the pin slightly on re-assembly to compensate, and its basically a friction folder from closed to half stop. Still good snap from there to full open though, and it holds open super tight, since I just barely touched that corner, to smooth it slightly.
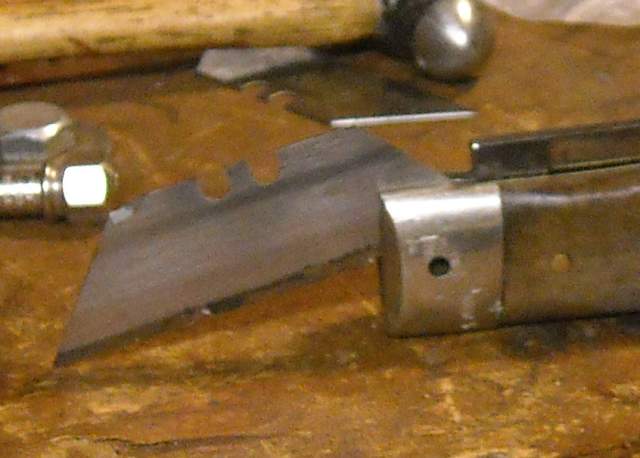
First step is to drive a razor blade in on both sides of the blade, shearing the pin. Remove blade and drive pin out of it, and the shearing should also torque the pi ends enough to see them on the bolster. I carefully center drilled one to remove the mushroom end, and drove it through, then drove the opposite side one out through that hole…
Mark approx radius on tang, and grind majority off, cooling with water.
Then comes the tedious repetitive part, fitting the blade back into the knife with pin and full spring tension, and removing it, filing/grinding off minute amounts till its the tension wanted…
I missed and went a little too far. It happens, especially when your out of practice and haven’t done this for a while..(used to do Tons of this kind of work customizing knives for people, but its been a few years since I’ve done one) :oops:
Re-assembly for each fitting is to place the blade in so that you can see part of the pivot hole in a bolster, and pushing a tapered awl in to align the blade, then clamp it in that position, remove the awl and tap the pin it. Check tension, re-clamp, remove pin, grind, repeat as necessary.
The 2 nickel silver pin sizes I had were either way too big, or the other one fit the bolsters OK, but was too loose in the blade. I found a steel nail that was a perfect fit for the blade, and I lightly reamed the bolsters to the same tight fit on it, and used that for the repeated fittings.
Now, since I altered how the blade sits on the spring, it then left the tip above the liners when closed. So, mark liner location on closed blade, mark approx. wanted tip profile, and grind down slowly and carefully, cooling extremely often to not scorch the tip/temper.
I was never able to get the abrupt edge geometry very sharp on this knife, so I also ran the whole blade on the belt sander on a ~600 grit belt and lowered the edge bevel angle to a thinner razor edge, and then buffed it(green chrome compound) for a polished edge; Like a light saber now! Buffed the whole knife to a nice shine when all else was said and done too.
I went ahead and left the nail head on one side when I did final assemble, and peened the other end to a visible rounded end. I figure I’ll use it for a while and see if I want to take it all the way apart and adjust the spring so it has snap closure again, or leave it as is.
Either way, I’ll remove the nail and either grind a NS pin to fit, or just peen both ends of another steel pin, and blend it in. (oddly enough, steel pins in NS bolsters is very traditional, and was done a Lot on older knives). The nail head is so-so for looks, but it works. I actually like the visible pin end on the other side, has a no nonsense, tough, functional look.


I’ve had this knife for about 6 years, and have only ever carried it maybe 10 times total. Its just so hard to open it with GECs signature bear trap springs, and the half stops.
SO, I got fed up and took it apart and rounded one tang corner off, so its a nice easy pull to the half stop, where I can the pinch the blade good and tight and pull to full open.
I’ll be honest, i took a little too much off, and there is almost no spring pressure closure… It has just a touch to help hold it shut, but no spring/snap closing. I over peened the pin slightly on re-assembly to compensate, and its basically a friction folder from closed to half stop. Still good snap from there to full open though, and it holds open super tight, since I just barely touched that corner, to smooth it slightly.
First step is to drive a razor blade in on both sides of the blade, shearing the pin. Remove blade and drive pin out of it, and the shearing should also torque the pi ends enough to see them on the bolster. I carefully center drilled one to remove the mushroom end, and drove it through, then drove the opposite side one out through that hole…
Mark approx radius on tang, and grind majority off, cooling with water.
Then comes the tedious repetitive part, fitting the blade back into the knife with pin and full spring tension, and removing it, filing/grinding off minute amounts till its the tension wanted…
I missed and went a little too far. It happens, especially when your out of practice and haven’t done this for a while..(used to do Tons of this kind of work customizing knives for people, but its been a few years since I’ve done one) :oops:
Re-assembly for each fitting is to place the blade in so that you can see part of the pivot hole in a bolster, and pushing a tapered awl in to align the blade, then clamp it in that position, remove the awl and tap the pin it. Check tension, re-clamp, remove pin, grind, repeat as necessary.
The 2 nickel silver pin sizes I had were either way too big, or the other one fit the bolsters OK, but was too loose in the blade. I found a steel nail that was a perfect fit for the blade, and I lightly reamed the bolsters to the same tight fit on it, and used that for the repeated fittings.
Now, since I altered how the blade sits on the spring, it then left the tip above the liners when closed. So, mark liner location on closed blade, mark approx. wanted tip profile, and grind down slowly and carefully, cooling extremely often to not scorch the tip/temper.
I was never able to get the abrupt edge geometry very sharp on this knife, so I also ran the whole blade on the belt sander on a ~600 grit belt and lowered the edge bevel angle to a thinner razor edge, and then buffed it(green chrome compound) for a polished edge; Like a light saber now! Buffed the whole knife to a nice shine when all else was said and done too.
I went ahead and left the nail head on one side when I did final assemble, and peened the other end to a visible rounded end. I figure I’ll use it for a while and see if I want to take it all the way apart and adjust the spring so it has snap closure again, or leave it as is.
Either way, I’ll remove the nail and either grind a NS pin to fit, or just peen both ends of another steel pin, and blend it in. (oddly enough, steel pins in NS bolsters is very traditional, and was done a Lot on older knives). The nail head is so-so for looks, but it works. I actually like the visible pin end on the other side, has a no nonsense, tough, functional look.
 .
.


